If you want to understand how to tile a shower, then it’s a very good idea to obtain the right guidance. We are here to help you figure out the process and make it simple or you. That’s why you need to consider using this guide if you want to make the process as simple and as convenient as possible for you!

Don’t move the shower pan
If you remove that, you basically end up complicating the entire process. You want everything to be simple and convenient. The last thing you want is to add in a whole lot of complications. Thankfully, you can add in a bit of mortar where needed. Also, the shower walls have to be waterproof, but there can be some water pools in the pan. So, clean that up and leave the water pan as it is.
Try to strip the shower stall to studs
Basically, everything aside from the floor pan has to be removed. Hiring a contractor can be a very good idea here. You don’t want the project to be ugly, and you want a simpler approach in this regard. This actually works really well, as long as you try to keep the current cement board, as that works quite nicely! It can be a bit messy, but you want to have this approach instead of a problematic one!
Read More, How to Clean Grout in Shower with Environmentally Friendly Treatments
Put the greenboard away from the shower stall
Instead of doing that, put a cement backer board. The focus here has to be on offering moisture resistance. Keep in mind that the greenboard is not moisture proof. So, it will end up leading to various issues. That’s why it makes a lot of sense to use greenboard in the outlying areas. It works really well, and it doesn’t bring in front any type of problem. You can install a cement backer board over the plastic that’s stapled to studs. There are some good brands like Wonderboard you can use for this.
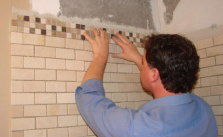
Mark and level the first tile row
Using a level will make the process a lot easier here. You want to mark the location of that first row, use a pencil and make sure that you avoid the tile’s bottom edge. The overlap can be of up to half an inch, so try to take that into consideration to get a good outcome!


Use thinset mortar
We recommend you to use thinset mortar as it’s better. Put it in the bottom row area and opt for some premixed mortar if you want too. This is a lot better because it offers a lot of value and it doesn’t overcomplicate your work. It really is exactly the way you imagine, and the return on investment can be huge in the end. If you are a pro tiler, you can buy dry, otherwise you should avoid this to get the best possible results.
The bottom row should stick without aid
If it doesn’t, then something is wrong and you have to take care of it as fast as you can. Press the first tile row and make sure that it doesn’t have any problems. If possible, you should consider leaving tit to stay there for half a day or so. After all, the other rows depend on this one, so the overall value is very important here.
Use spacers
Spacers are necessary as you continue to add new rows of tiles. You want to install the upper rows, and then you need to use spacers in order to keep them at a distance from one another. Use the tile spacers on all 4 sides to get the best results. You will have to cut everything to size if you want a good fit, so try to keep that in mind!
Grout, tile and then use a wet sponge
Leave it be for 2 days, then make sure that you use the rubber float in order to press the group into those open seams. You need to remove all the excess, as that will make the process easier. The idea is to avoid adding too much pressure, as that’s where you will have the most problems.
Read More, Best Way to Clean Tile Floors Which Will Amaze You
Use a haze remover
If necessary, opt for a haze remover. You have to repeat this process when everything is almost removed. You then have to seal the seams with a bit of a special grout sealer so you can get the best results. If you don’t do this the right way, water can end up working its way here.
What materials and tools do you need?
- Wet tile saw
- Snap cutter
- Tile
- Thinset mortar
- Grout
- Notched towel
- Sponge
- Bathroom silicone
- Tile spacers, rubber float
- A 4 mil plastic sheet
- Fiberglass seam sealer
- Staple gun
- Utility knife
- Jigsaw
- Cement board screws
- A cement backer board
If there’s one thing to keep in mind, then you should always try to avoid making a mess. Cleaning things up adequately should always be your concern. Thankfully, that won’t take a lot of time and it can help you a lot too. The idea is to know how to tackle any potential problems and make the most out of the situation. Value is very important, so try to take your time and use that to your advantage. As long as you clean everything and follow the instructions above, results can be more than ok.


Remember, this is not an exact science. Each time you learn how to tile a shower, things will be different. Obviously, you have to adapt everything in order to suit your needs. But if you do that adequately, then your results can really shine. And it’s by far the best thing you can do in such a situation. It’s not always going to be easy, but if you know how and when to tackle this sort of problems, the outcome can be really good. So yes, take your time and remember that the more you focus on cleaning everything and sticking to the guidelines, the better the outcome will be!
One response to “Learn How to Tile a Shower The Right Way”
You may want to waterproof the tub shower before you tile over the green board or cement board. They are not waterproof